When constructing a house, you rely on various professionals—like plumbers, electricians, and architects—to complete the project. Similarly, in the NPS architecture, several entities work together behind the scenes to streamline the investment process. Just as you receive the final documents for your home, with NPS, you are issued a PRAN (Permanent Retirement Account Number) once your account is opened. This unique and portable number stays with you throughout your NPS journey, ensuring smooth management of your retirement savings. Upon successful registration, the PRAN serves as your key identifier in the system.
Now, let’s discuss the various entities in the NPS ecosystem that help make the transaction process smoother:
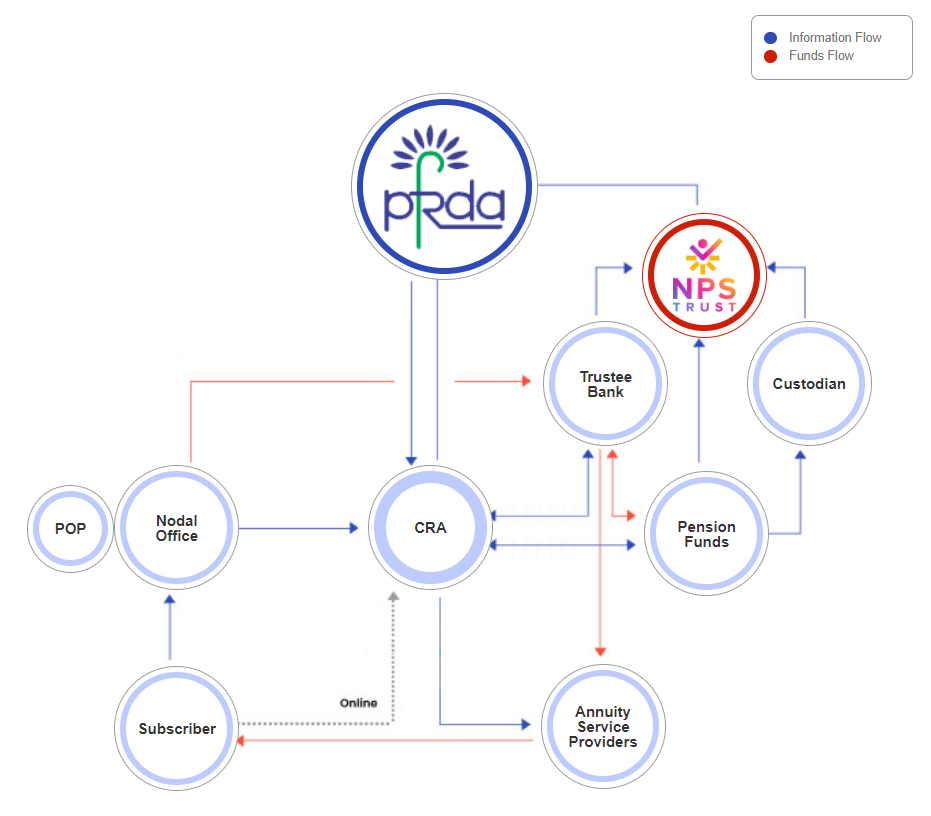
- The one who helps in opening an account – PoP (Point of Presence):
- PoPs act as your first point of contact. They assist in opening your NPS account, provide information, and help you with transactions and any inquiries about the scheme.
- Usually, banks and other financial institutions take on the role of PoP to sell NPS. They charge a small commission on every contribution you make to the NPS.
- PoPs are available both online and in physical branches. You can find the list of registered PoPs here.
- The one which administers the NPS transactions and maintains records – CRA (Central Record Keeping Agency):
- CRAs get subscriber information either directly from the individual or through PoPs. Once they receive the details, they assign a PRAN and manage all the backend operations of your NPS account. This includes maintaining records, tracking your contributions, sending regular account updates, and ensuring the smooth administrative functioning of your account. The three CRAs currently are Protean (formerly NSDL e-Gov), CAMS, and KFintech.
- The one who manages the funds – Pension Fund Managers (PFM):
- PFMs are the fund managers you choose at the time of registration or application, such as SBI Pension Fund, UTI Pension Fund, or others. They handle the actual investment of your NPS contributions, allocating them across asset classes like equity, debt, and government securities, based on your preferred scheme and risk profile.
- The one which looks after day-to-day fund flow management – Trustee Bank:
- Now, PoPs and CRAs send the contributions received to the Trustee Bank. This bank acts as an intermediary between the CRA and the pension fund managers. The trustee bank takes instructions from the CRA on how to allocate the funds to the pension funds and executes the transfers accordingly. Currently, Axis Bank functions as the trustee bank.
- The one which helps in the safe-keeping of securities bought by pension funds – Custodian Bank:
- The pension funds then use the money to buy securities, but these are held in the name of the NPS Trust. While the trust technically owns the securities, the real beneficiaries are you, the subscribers. All these securities are managed in demat form by a custodian bank, which ensures their safekeeping. The custodian bank (currently Deutsche Bank) also ensures the receipt of dividends and informs pension funds about any corporate actions related to these securities.
- The one which looks after all the above activities – NPS Trust:
- The NPS Trust is responsible for managing your assets and ensuring everything follows the rules set by the regulator. They also oversee the accounts and monitor the performance and services of all the intermediaries involved in the NPS.
- The one which regulates the NPS space – PFRDA (Pension Fund Regulatory and Development Authority):
- PFRDA is the regulator that supervises the NPS, ensuring that all entities comply with the rules and operate in the best interest of subscribers.
Now, all these entities charge some notional fee to the customer –
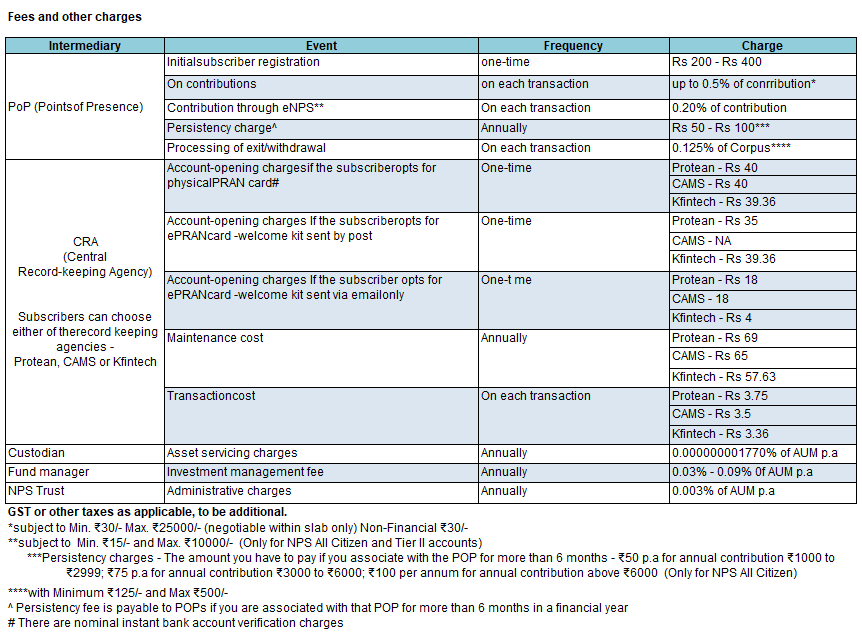
Source: Compiled from NPS Trust as at the time of publishing this article
Choosing Between a CRA or a PoP
You can open an account with NPS either through CRA directly or POP, which acts as an intermediary. Whether you open your NPS account through a CRA or a PoP, the CRA charges are standard since this entity handles all the administrative work. On the other hand, the PoP acts as a distributor, so if you go through them, an extra commission will be charged on each transaction.
As shown in the table, this extra commission can be up to 0.5% of your contribution, with a minimum of ₹30 and a maximum of ₹25,000 on every contribution. So, this is an additional cost to consider.
However, you can open your NPS account with a PoP and later choose to make future contributions directly through the CRA platform (called eNPS). Even in this case, the PoP commission will still apply to your contributions, though the charges are slightly lower when using the CRA platform than going through the PoP for every transaction, as shown in the table.
- If you’re confident in managing your NPS investments as a DIY investor, you can avoid extra commissions and go directly through the CRA.
- But, if you feel you need some guidance or hand-holding with understanding the NPS rules or managing your transactions, and you’re okay with paying a bit more for that help, then choosing a PoP might be a better option.
It’s similar to investing directly in mutual funds versus using a distributor. In one case, you save on commissions but manage things on your own, while in the other, you pay a bit more for extra support.
The process to open an NPS account
-
Opening an NPS Account Directly with CRA (eNPS)
To open an NPS account directly through a CRA—called the eNPS account opening—just head to their websites (KFintech, CAMS, or Protean) and start the registration process.
You’ll need your PAN number, mobile number, email ID, and date of birth for the initial registration. After that, you can proceed with Aadhaar-based registration.
During registration, you’ll need to choose a fund manager and decide whether you want the active choice (where you allocate assets yourself) or auto choice (where it’s done based on your age). You’ll also provide your bank details. You’ll be asked to fill in FATCA (Foreign Account Tax Compliance Act) details. This is mandatory for all NRIs and Persons of Indian Origin (PIOs) based in the United States. FATCA compliance ensures that the US government tracks foreign accounts held by US residents or citizens. The procedure for this is called self-certification, where Indian financial institutions ask NRI account holders to verify certain information about themselves. After this, the financial institutions perform due diligence and verify the self-declaration.
Additionally, you’ll need to provide your nomination details (who will receive the NPS benefits in case of your untimely demise).
You might be asked to upload your signature, and the process usually involves Aadhaar authentication. Once that’s done, you can make your initial contribution to NPS—both for Tier 1 and Tier 2 accounts.
In about two days, you should receive your PRAN number (generated by the CRA), which you’ll use going forward. Just keep in mind that it usually takes T+2 days for your contribution to show up in your account.
Once that’s all set, you’re good to go! You can also use the eNPS app to manage everything more easily. This whole process is fully online through the CRA.
-
Opening an NPS Account Through PoPs
Alternatively, you can open an account through a PoP. There are over 80,000 branches of PoPs across India, all ready to help you open an account. If you’re already a PoP customer (like SBI), KYC and banking verification might be faster since they already know you. Just like they offer insurance or mutual funds, they handle NPS accounts too.
You typically have three options: 1. Completely online; 2. Online form with submission at a branch; 3. Fully in-person at the branch for the entire registration process.
Once you provide all the required details (including nomination information), the registration begins. The time it takes to generate your PRAN varies, but online registrations are generally quicker. If you’re doing it in physical mode, it’s recommended to wait for PRAN generation before making your initial contribution. You’ll get an SMS or email once the PRAN is generated, so don’t worry.
You’ll receive two receipts—one for registration and one for your contribution.
In the future, you can switch to a different PoP. Also, if you started with the eNPS mode (via CRA), you can switch to PoP later. But the reverse—starting with a PoP and switching to eNPS—is not allowed.
-
Opening an NPS SIP
Generally, NPS transactions take T+2 days to be processed. To speed up the process, a relatively new facility called D-remit has been introduced. The D-Remit (Direct Remittance) facility allows you to transfer funds directly from your bank account to your NPS account without needing intermediaries like CRA or POP platforms.
For this, you need to have a NPS Vitual id. You ca check the steps to create a virtual id here.
Once the virtual ID is created, you can add this number to your net banking facility as a beneficiary to transfer the amount to your NPS account. You can also transfer money to NPS via UPI by adding this virtual ID to your app.
D-remit gives you the advantage of same-day NAV. This means that if the markets drop on a particular day and the net asset value (NAV) of your NPS units falls, you can make a contribution at those lower levels, provided you make your contribution before the cut-off time. By doing so, you’ll get the allocation on the same day instead of having to wait for two days, during which the markets might rise again.
This feature is especially useful if you’re looking to automate your NPS contributions and prefer to use a Systematic Investment Plan (SIP). Just add your virtual ID to give standing instructions to your bank to deduct a certain amount every month from your account towards NPS.
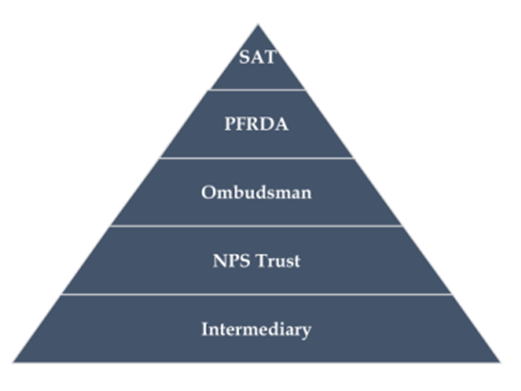
Grievance Redressal
If you have any issues with your NPS account, you can first raise a complaint with your POP (Point of Presence). They should help resolve your issue through their grievance redressal system. If needed, you can also visit their branch in person to file your complaint.
Additionally, you can raise a grievance on the CRA website you’re registered with. Each CRA has its own Central Grievance Management System (CGMS), and once you submit your issue, it gets forwarded to the relevant office or intermediary. You’ll receive updates via email.
The entity you raise the grievance against should resolve it within 30 days. Whenever you submit a complaint online, you’ll get a token number, which you can use to check the status later.
You can also track the status of your complaint online.
If the subscriber is unhappy with the grievance, he/she can escalate the complaint to the next higher level. Here is the escalation matrix. You can find email IDs of each level online.
Source: NPS Trust
Key takeaways
- Several entities work together in the NPS ecosystem, including POPs, CRAs, pension fund managers, trustee and custodian banks, the NPS Trust, and PFRDA. Most charge a nominal fee.
- You can open an account either through a POP or directly with a CRA. POPs act as intermediaries and charge a commission on every contribution.
- PRAN (Permanent Retirement Account Number) is your unique NPS identifier and remains with you throughout your account’s lifecycle.
- The NPS D-Remit facility allows you to set up a SIP through your bank for easy contributions.
- If you have any complaints, you can lodge them with your respective CRA via the Central Grievance Management System (CGMS), and they should be resolved within 30 days.
I just want to know, how to remove pop from nps, cz i want to invest directly myself. Open nps through Sbi pop online charged me Rs 400 . Now I want full control of nps by myself ( protean). What is the process , plz tell SIP process also . Thank you
Hi Surajit,
I hear that there is no way to remove a POP from NPS account once added, people can port between POP to get better services though. Having said that, you can still invest/transact through a CRA – there\’s some amount that still goes to POP, but will be lower than directly transacting on POP platform.
Is Passive Investing which just tracks the benchmark available in NPS Scheme, Tier I or II?
Hi Sarthak,
That isn\’t there in NPS yet. Pension funds are allowed to launch new schemes going forward. May be a passive fund will be launched too 🙂
Hi Satya,
Is account opening and investment options same for All citizen model and corporate model
Hi Shyam,
In terms of investment options, yes- same.
With respect to account opening process, it\’s different. Corporate NPS account is generally opened by the company on behalf of you once you submit the details. In the case of All Citizens Model, it has to be opened by you.
One benefit with corporate NPS is that you get tax benefits and the backend costs will be borne by the employer.
Hope this helps.
This has been my go-to guide for everything NPS.
Do you personally think NPS is a good investment if I am able to maintain a retirement corpus with discipline (although if the past is an indicator, data does not favour me)
Thanks a lot, Satya!
Thanks for your kind words, Varad.
Answering your question if NPS is a good option for your retirement corpus, let me share what I personally think broadly, as I mentioned in the module as well.
It’s good to have exposure to NPS, but it may not be with 100% of funds for retirement corpus. NPS offers good tax benefits at the time of purchase, and the multiple-stage lock-ins ensure you have a cushion to fall back on if everything else goes wrong. The balance amount can be diversified and invested elsewhere, which gives you more control over access to and use of your funds at retirement.
This is assuming you are capable of making sound financial decisions. If you want the system to insist some financial discipline and you don’t mind sacrificing a few bucks for the security/relief the product provides, NPS is an excellent choice for you.
For more context – you can check the last segment in this – https://zerodha.com/varsity/chapter/nps-vs-other-retirement-plans/
Thank you!
What are the advantages-disadvantages of opening NPS account with eNPS vis a vis any POP. And amongst the POPs, which is the best? How to decide? What is the difference, how is the experience different?
Hi Aarti,
Copy pasting the same text in this chapter on the said topic –
You can open an account with NPS either through CRA (called eNPS) directly or POP, which acts as an intermediary. Whether you open your NPS account through a CRA or a PoP, the CRA charges are standard since this entity handles all the administrative work. On the other hand, the PoP acts as a distributor, so if you go through them, an extra commission will be charged on each transaction.
As shown in the table, this extra commission can be up to 0.5% of your contribution, with a minimum of ₹30 and a maximum of ₹25,000 on every contribution. So, this is an additional cost to consider.
However, you can open your NPS account with a PoP and later choose to make future contributions directly through the CRA platform. Even in this case, the PoP commission will still apply to your contributions, though the charges are slightly lower when using the CRA platform than going through the PoP for every transaction, as shown in the table.
If you’re confident in managing your NPS investments as a DIY investor, you can avoid extra commissions and go directly through the CRA.
But, if you feel you need some guidance or hand-holding with understanding the NPS rules or managing your transactions, and you’re okay with paying a bit more for that help, then choosing a PoP might be a better option.
Coming to which POP is better, we can\’t comment on that. May be you can consider the bank you currently have a bank account with, if you are happy with their services.
Hope it helps.